Kerm here,
Today is Saturday and I promised Chris yesterday that I would not work on the boat today. We'll see how that all works out. So, we do Chris stuff. Take a walk, eat breakfast out, the flea market, etc, etc. I promised. I'll give you an update later if there is anything earth shattering happens but I doubt it.
We pretty much finished the caulking and some touch up yesterday. Now we wait a couple of days for it to dry and then sand it. I'm sure that as we go there will be other areas that we will notice that will need some further touch up but all in all the pressure is off. I did notice that one section of board will probably need replacing but I'll need to find a piece that is worn similar to the rest. In the one piece that I already replaced it doesn't look very good because it's just too nice of piece. At Linda's, I have the old teak board covered hatch cover from the fly bridge and I'll take a look at that as far as the matching goes. Right now Linda is using the cover for a step by her back door until her new patio is put in. Perhaps me taking the step will hustle that project along.
We got measured up yesterday for a new Bimini top for the fly bridge cockpit. The old one was a bit long in the tooth. It wasn't the greatest when we bought the boat and was torn up but fixed on the cheap when we were in the tornado a couple of years ago. Then the windstorms Chris and Linda were in towards the end of the Bahamas adventure this year pretty much killed it. Repairs probably could have been made to keep it going but the UV protection of the material was shot. You could just feel the UV frying you even under the top. Mother Nature just hastened the total replacement. The new top will also have attachment points for doing a total enclosure for the helm area. Enclosures are now pretty much the norm on the trawlers today. At this point, an enclosure is not on our short list but I guess never say never. The upholstery guys will also be repairing the fly bridge cover and window covers that are coming apart. While the tarp and window cover material still looks good the UV has killed the thread but will be replaced with a new UV resistant type.
Dan is doing well and we are looking forward to visiting him in Cleveland later in June. He's having a great time flying jets and carrying cattle (passengers). For years Dan avoided the whole passenger/scheduled airline type of flying but now is having a great time. Maybe it's just part of getting older. Right now his wants are to have a permanent station and to buy a house. He says with a big garage or pole barn. A chip off the old block he is. Car, boat, airplane? I smell project.
Nuff for now. Chris is up, breakfast, flea market... Oh, boy.
Saturday, May 31, 2014
Thursday, May 29, 2014
Broken bodies but beat the rain
Kerm here,
With the exception of some touch up our caulking of the front deck and sides down to the steps is done. Yes I know we were going to cool it and not work yesterday but our plastic rain covers started coming apart from the wind so we finished up masking and started laying down caulk just after lunch. We worked until about 8 PM and got about three quarters done before our bodies gave out. Thank goodness the rain held out. This morning we finished the job about 1 minute before the rain started. Whew, that was a close one. While the dew was burning off this morning I did take off some masking in the area we caulked yesterday and most everything looks good. Maybe some touch up here or there but not bad for a couple of amatures.
From here we take off the rest of the masking tomorrow, wait a few days and sand the high spots off. At some point I will also have to fix a few spots where the caulk sagged too much and 3 or 4 small areas where I missed towards the end last night.
So here are the steps. 1. Clean the deck areas to be caulked. 2. Use a mild acid to brighten and deep cleaning. 3. Mask. 4. Caulk. 5. Take off masking. 6. Fix imperfections. 7. Sand off high spots. 8 Fix imperfections. 9. Sand said imperfections.
All done? Nope. There are many dowels that need to be replaced as the expansion and contraction of the deck have loosened them in there holes. These dowels cover the countersunk screws that hold the deck down and prevent water from leaking down into the subdeck. Bad deal as the decks then become spongy. When we were looking at boats of this type they fell into categories. Spongy decks with teak coverings or solid decks that had been replaced $$,$$$$. And, very, very few with teak coverings with solid underpinnings. The 'Belle' was one of the few with decent teak and solid a substrate. All this work is intended to keep it that way. It was hard last night at 8 o'clock when we were too tired to eat but it will all be worth it in the end.
All of this work has been quite a show for our stable mates here in the marina as most people have contractors do the work on their boats. It's like a traffic jam in the morning as the boat cleaners, mechanical dudes and electrical guys come down and keep the fleet going. This is not the best place to look for advice on this or that from other boat owners.
As a final word, many of you may ask is all this work worth it? Why don't you get a newer boat without the teak and not a traveling 30 year old antique? Stupid? Glutton for punishment? Perhaps but wherever we go people keep telling us what a beautiful boat the Belle is. It's the wood, the old school styling and the condition we keep the boat in. While there is great personal satisfaction for us in keeping something old looking good those compliments are icing on the cake.
 Tape on, goop on, wait
With the exception of some touch up our caulking of the front deck and sides down to the steps is done. Yes I know we were going to cool it and not work yesterday but our plastic rain covers started coming apart from the wind so we finished up masking and started laying down caulk just after lunch. We worked until about 8 PM and got about three quarters done before our bodies gave out. Thank goodness the rain held out. This morning we finished the job about 1 minute before the rain started. Whew, that was a close one. While the dew was burning off this morning I did take off some masking in the area we caulked yesterday and most everything looks good. Maybe some touch up here or there but not bad for a couple of amatures.
From here we take off the rest of the masking tomorrow, wait a few days and sand the high spots off. At some point I will also have to fix a few spots where the caulk sagged too much and 3 or 4 small areas where I missed towards the end last night.
So here are the steps. 1. Clean the deck areas to be caulked. 2. Use a mild acid to brighten and deep cleaning. 3. Mask. 4. Caulk. 5. Take off masking. 6. Fix imperfections. 7. Sand off high spots. 8 Fix imperfections. 9. Sand said imperfections.
All done? Nope. There are many dowels that need to be replaced as the expansion and contraction of the deck have loosened them in there holes. These dowels cover the countersunk screws that hold the deck down and prevent water from leaking down into the subdeck. Bad deal as the decks then become spongy. When we were looking at boats of this type they fell into categories. Spongy decks with teak coverings or solid decks that had been replaced $$,$$$$. And, very, very few with teak coverings with solid underpinnings. The 'Belle' was one of the few with decent teak and solid a substrate. All this work is intended to keep it that way. It was hard last night at 8 o'clock when we were too tired to eat but it will all be worth it in the end.
All of this work has been quite a show for our stable mates here in the marina as most people have contractors do the work on their boats. It's like a traffic jam in the morning as the boat cleaners, mechanical dudes and electrical guys come down and keep the fleet going. This is not the best place to look for advice on this or that from other boat owners.
As a final word, many of you may ask is all this work worth it? Why don't you get a newer boat without the teak and not a traveling 30 year old antique? Stupid? Glutton for punishment? Perhaps but wherever we go people keep telling us what a beautiful boat the Belle is. It's the wood, the old school styling and the condition we keep the boat in. While there is great personal satisfaction for us in keeping something old looking good those compliments are icing on the cake.
Wednesday, May 28, 2014
Working the decks
Kerm here,
Every few years the calking between the outside deck boards need to be recaulked. The old caulk gets hard and brittle from the UV and breaks away from the wood, creating paths for water to get below the boards and eventually rot the deck below. It's a rotten job especially when the heat index is crazy hot. Yesterday I took off my sandals while working and burned the bottoms of my feet from the hot deck. Crazy hot.
Up to the point of starting last Friday I did my research on how to remove the old caulking and purchased the tools of choice. Waste of money. None of it worked and I basically had to use ground down screwdrivers and an X-acto knife to pull it out. As the old gardening song goes "inch by inch, row by row". So, Friday, Saturday, Sunday, Monday, Tuesday and all I got done was the front deck and side decks just down to the steps. Less than half done. I drank more Gatorade than the whole Oregon football team playing in the Rose Bowl.
The good news was that wood repair was minimal although when the caulking is all done I may go back and fix a couple of cracks and perhaps replace a couple of partial boards. All in all, considering the age of the wood and the climate it lives in, it's going to look pretty decent when it's all done.
Today is a down day. We covered the deck with plastic in case there is rain. Let's hope the wind stays down so the plastic stays in place. Tomorrow I'll mask off the boards and then let the caulking begin. I figure 20+ tubes with the caulking gun. The tendons in my carpel tunnel will be screaming by the end of the day. After caulk dries the tape gets pulled off and lastly the decks get sanded.
All buttoned up waiting for a new spurt of energy
Wednesday, May 21, 2014
Git'n in the groove
Kerm here,
The first project this week was to put hinges on one of the floor hatches to the engine room. In the past we had to remove the hatch to go down there. It's heavy and we probably put some nicks in the area where we set it aside. All in all a pain in you know where. This has been on the list since we bought the boat but as the hinges needed to be chiseled into the parquet floor I procrastinated as it takes a bit of skill that I did not have plus it's easy to screw up. With a bit of a push from Chris I finally bit the bullet and took the challenge. It took a day and turned out better than I expected. Sometimes I surprise even myself. The easy part of the install then turned out to be the most difficult. We both thought it would be nice if we used a gas spring to assist in raising the hatch and as a prop to keep it open. This was a fail for various reasons and we ended up using a hatch rod like is used on a deck hatch. With this we still have to raise the hatch by hand and twist a knob to lock it in. Sometimes simple is best. As we sat admiring the completed project Chris mentioned that it's one down and one to go. The hatch further forward. No rest for the wicked, but I think I would like to bask in the first install for awhile before tackling the next one.
 What a ham
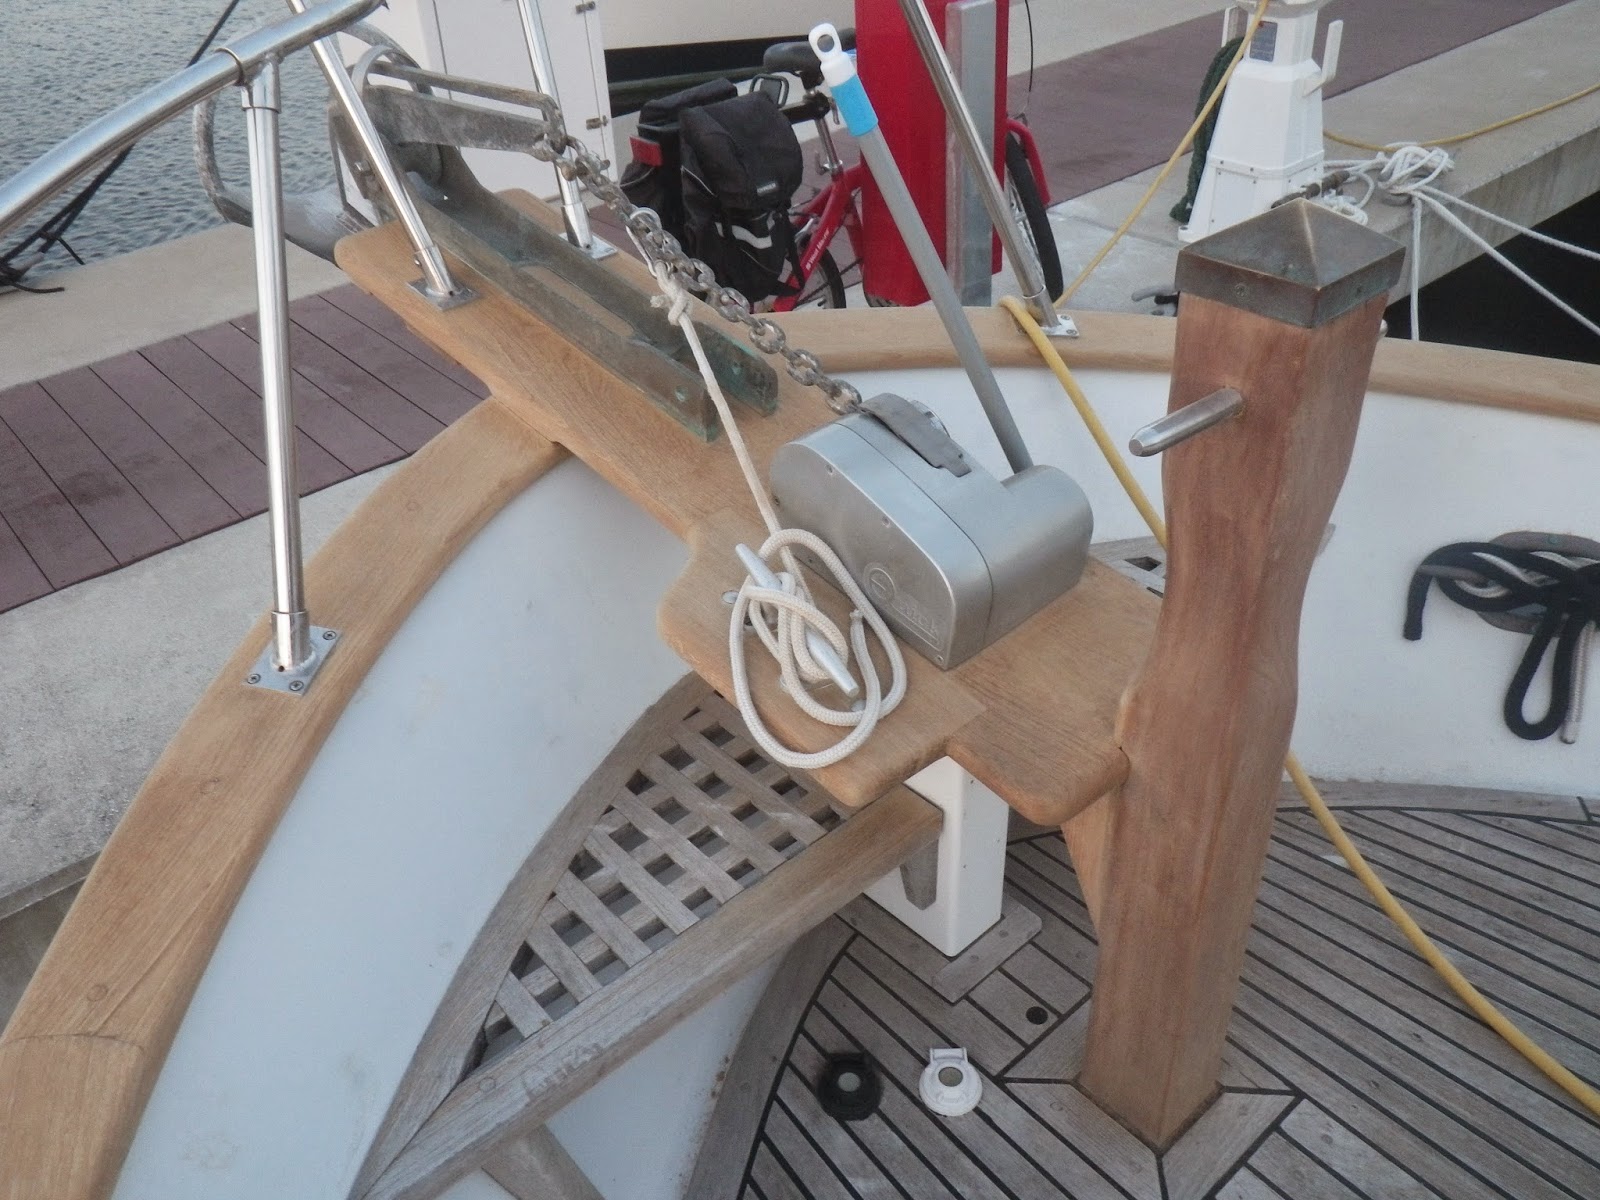
No sit'n around here. Next, the teak cap rail around the boat and the bow pulpit was looking bad so we decided to refinish it. Normally you wouldn't have to take it all the way down to bare wood but we sort of neglected it. You are supposed to recoat it every 6 months or so but we ignored it in favor of recreation duties.
As with most projects there was a fly in the ointment. There were black stains coming from the bow rail stanchions where they attach to the cap rail. Seems that there are weep holes at the stanchion bases where water and dirt can drain out of the stanchions. Also, improperly bedded bases collected dirt that would weep out when it rained. The starboard side was the worst so I took off the rail and bases for re-bedding and blocked the weep holes. We'll see if that comes back to bite me in the butt.
Then it was wash, acid and sand. Not so bad. 2 days. And now we let it sit for a few days before we put on a couple coats of Semco wood preservative. I hope we learned our lesson. The instructions say "recoat when necessary".
 Ready for Semco
The next on the list was an easy one but for some reason I procrastinated for a whole year. The weather station panel had been kicking around on counters getting in the way where ever it sat but for some reason I didn't take a few minutes an attach it to a wall. Linda bought the station last year and it has been a wonderful tool. How did Columbus every get by with out one I will never know. Attached is the install along with the working part on the mast. It's on the left mounted on the spreader.
 We once saw 34 knots for wind speed
 The mast on the right is somebody else
Also note the new LED spreader lights installed last year
Chris here-
Kerm is back 'on the job'. Lots getting done...my studying is suffering a bit (also my gossip sessions with the guys around the marina) but it is wonderful to have him home again.
I snapped a couple more pictures for you
The diver cleaned Belle's bottom on Thursday and said our paint is looking good. He will replace Zinc anodes next month when he cleans again. We are having a new Bimini top made. Existing one tore a bit when we got that 34 knot wind Kerm mentioned and the fabric's sunblocking capabilities were shot. That work should be started this week.
That's all from here this morning. Take care all.
The first project this week was to put hinges on one of the floor hatches to the engine room. In the past we had to remove the hatch to go down there. It's heavy and we probably put some nicks in the area where we set it aside. All in all a pain in you know where. This has been on the list since we bought the boat but as the hinges needed to be chiseled into the parquet floor I procrastinated as it takes a bit of skill that I did not have plus it's easy to screw up. With a bit of a push from Chris I finally bit the bullet and took the challenge. It took a day and turned out better than I expected. Sometimes I surprise even myself. The easy part of the install then turned out to be the most difficult. We both thought it would be nice if we used a gas spring to assist in raising the hatch and as a prop to keep it open. This was a fail for various reasons and we ended up using a hatch rod like is used on a deck hatch. With this we still have to raise the hatch by hand and twist a knob to lock it in. Sometimes simple is best. As we sat admiring the completed project Chris mentioned that it's one down and one to go. The hatch further forward. No rest for the wicked, but I think I would like to bask in the first install for awhile before tackling the next one.
No sit'n around here. Next, the teak cap rail around the boat and the bow pulpit was looking bad so we decided to refinish it. Normally you wouldn't have to take it all the way down to bare wood but we sort of neglected it. You are supposed to recoat it every 6 months or so but we ignored it in favor of recreation duties.
As with most projects there was a fly in the ointment. There were black stains coming from the bow rail stanchions where they attach to the cap rail. Seems that there are weep holes at the stanchion bases where water and dirt can drain out of the stanchions. Also, improperly bedded bases collected dirt that would weep out when it rained. The starboard side was the worst so I took off the rail and bases for re-bedding and blocked the weep holes. We'll see if that comes back to bite me in the butt.
Then it was wash, acid and sand. Not so bad. 2 days. And now we let it sit for a few days before we put on a couple coats of Semco wood preservative. I hope we learned our lesson. The instructions say "recoat when necessary".
The next on the list was an easy one but for some reason I procrastinated for a whole year. The weather station panel had been kicking around on counters getting in the way where ever it sat but for some reason I didn't take a few minutes an attach it to a wall. Linda bought the station last year and it has been a wonderful tool. How did Columbus every get by with out one I will never know. Attached is the install along with the working part on the mast. It's on the left mounted on the spreader.
Also note the new LED spreader lights installed last year
Chris here-
Kerm is back 'on the job'. Lots getting done...my studying is suffering a bit (also my gossip sessions with the guys around the marina) but it is wonderful to have him home again.
I snapped a couple more pictures for you
 |
| Boat Jewelry |
 |
| Transom door and cap rail |
 |
| Cap rail waiting for Semco |
 |
| new transportation |
The diver cleaned Belle's bottom on Thursday and said our paint is looking good. He will replace Zinc anodes next month when he cleans again. We are having a new Bimini top made. Existing one tore a bit when we got that 34 knot wind Kerm mentioned and the fabric's sunblocking capabilities were shot. That work should be started this week.
That's all from here this morning. Take care all.
Thursday, May 15, 2014
Back in the saddle again...
Kerm here,
The battery charger install was a challenge. The old charger had wires about a quarter the size and did not have circuit protection at the batteries as code requires. When I built the new battery box last year I did not leave enough room for all the breakers, fuses and switches that are required for the main DC system plus the upgraded battery charger. The old system had either none, were painfully undersized or just plain c**p components. The photo below was my solution but again, I did not leave enough room to do it as well as I would have liked.
 The circuit breaker / switches are for the alternator main run, house batteries and engine battery. The thing in the middle controls the alternator charging for both circuits. The plastic covers are over the fuses for the battery charger circuits. Ain't no mo room. Have to get a bigger boat if something comes up. To service the batteries the cover with the holes hinges up and I added a prop to keep it up when doing my due diligence. The black squares are non slip as this is where I step when getting down into the engine room. Nice touch if I do say so myself plus I had been carrying that c**p around in the boat for years and I wanted to get rid of it once and for all.
After firing up the system all worked well and we're finally getting a good charge on the batteries and with the remote feature we can keep an eye on the capacity and health of them. Done.
Now the propane monitor / safety system. Last summer I installed a propane fume monitor/alarm combined with a solenoid valve. We don't want to wake up dead or blow the boat up. Problem is/was that the sensor is so sensitive that we get a lot of false alarms that trigger a painfully loud alarm and the propane shuts off which tends to ruin the souffle. After several phone calls to the manufacturer and 'interwebing' the problem we're moving the sensor. It seems that there are just too many smells in the bilge that set it off. So more wiring as we will be moving it to the sleeping area although I wonder about smelly socks.
While there are a multitude of other small electrical and mechanical fix ups plus fluid changes that are on the list I'm moving on to cosmetics as the UV and salt is setting us back a couple of steps. The next boat will not have wood anywhere. It may have the pizazz of a plastic bathroom shower stall but I won't need even one piece of sandpaper on board, nor varnish, nor stain, nor chisels, nor routers, nor doweling equipment, nor saws and on and on... What do those people do on those boats anyway?
The battery charger install was a challenge. The old charger had wires about a quarter the size and did not have circuit protection at the batteries as code requires. When I built the new battery box last year I did not leave enough room for all the breakers, fuses and switches that are required for the main DC system plus the upgraded battery charger. The old system had either none, were painfully undersized or just plain c**p components. The photo below was my solution but again, I did not leave enough room to do it as well as I would have liked.
After firing up the system all worked well and we're finally getting a good charge on the batteries and with the remote feature we can keep an eye on the capacity and health of them. Done.
Now the propane monitor / safety system. Last summer I installed a propane fume monitor/alarm combined with a solenoid valve. We don't want to wake up dead or blow the boat up. Problem is/was that the sensor is so sensitive that we get a lot of false alarms that trigger a painfully loud alarm and the propane shuts off which tends to ruin the souffle. After several phone calls to the manufacturer and 'interwebing' the problem we're moving the sensor. It seems that there are just too many smells in the bilge that set it off. So more wiring as we will be moving it to the sleeping area although I wonder about smelly socks.
While there are a multitude of other small electrical and mechanical fix ups plus fluid changes that are on the list I'm moving on to cosmetics as the UV and salt is setting us back a couple of steps. The next boat will not have wood anywhere. It may have the pizazz of a plastic bathroom shower stall but I won't need even one piece of sandpaper on board, nor varnish, nor stain, nor chisels, nor routers, nor doweling equipment, nor saws and on and on... What do those people do on those boats anyway?
Tuesday, May 13, 2014
Kerm is back on the Belle!!
 |
| A Happy Man sitting for a moment |
 |
He likes the marina, as I was sure he would, and we try to get a morning walk in every day before work begins.
Right now he is installing a new battery charging system to replace the original one that was woefully undersized. The new 40 Amp charger also has a remote panel that will be mounted on the steering console above the generator and inverter panels. The remote will provide diagnostics on both house and engine battery banks. A very nice upgrade for the Belle. We will be able to monitor everything 'battery related' from an easily accessible remote instead of having to go into the engine room and monkey around with things down there.
 |
| New charger on the right, inverter to the left. |
 |
| Remote...not mounted yet but look at all those pretty lights. |
The marina is emptying out as cruisers head north for the summer. The free marina-provided bus trips around town are suspended until the busy season begins again in September/October. Cook-outs and free movie nights are also on hiatus.
We don't know right now what our summer plans are from a cruising standpoint. We do know we are heading up to MN (minus the Belle) for family festivities over the Fouth of July holidays. We will drive Kerm's truck and on the way stop in Cleveland to visit Dan and Carrie. Another stop will be at Mid-Ohio raceway to spectate/crew on Kerm's brother's Mini for the big MINI 50 celebration in late June.
That's my news for now. All is well on the Belle. It is great to have Kerm home again.
Until next time,
Christie
Subscribe to:
Posts (Atom)